
Make these DIY dryer sheets in two minutes or less! These DIY dryer sheets are not only extremely cost effective, great for the environment, but also SUPER EASY to make. With only a few items, all super cheap (many can be found at your local Dollar Tree) or even free with items you probably already have in your home.
What is the Difference between the DIY Dryer Sheets and the Store Bought Dryer Sheets?
The biggest difference between the DIY dryer sheets and the store-bought dryer sheets is that you know what the ingredients are. Store bought dryer sheets, although approved by the FDA, carry some form of chemicals in the dryer sheets. Most of which coming from the fragrances put in them. These fragrances can lead to skin irritations, migraines, and even asthma attacks. Yes, there is the fragrance-free option, but there is also other components that make up the store-bought dryer sheets that are these big, long names that no one understands or can pronounce. I don’t know about you, but I have been more mindful of the ingredients in the things that I put in, on and around mine and my family’s bodies. If you are interested in reading the article about this, click here.
Why are DIY Dryer Sheets Better?
The number one thing as to why DIY dryer sheets are better than store bought ones (in my opinion) is that they are REUSABLE! No more throwing money in the garbage after each dryer load. Say good-bye the loose dryer sheets floating around the house, getting stuck to your clothing, dirtying and cluttering up your laundry room. None of that unnecessary headache!
It take two minutes or less to make. No having to waste gas running to the store. Not wasting time having to pack the kids up in the car to run to the store. And can we all give a big UGH! when it comes to bringing our kids into a store.
Another reason to why DIY dryer sheets are better than store bought, is how much you can actually save by making this switch. Think about it! On average, you are spending $5-10 on a box of dryer sheets. That’s a lot of money that you are LITERALLY throwing away. Now, if you take that money, and put it towards making your own, you would be saving so much in the long run!
Last, but certainly not least as to why these DIY dryer sheets are better, is how easy it is to make. Once you have everything you need, it will take you less than two minutes to make. Your mind will be blown at how simple and easy this quick DIY is.
What You Will Need:
To make the DIY dryer sheets in two minutes or less, you will need three things. There are five things in total, but two of them are completely optional. I’m sure you have these items lying around your house right now, just waiting for a purpose.
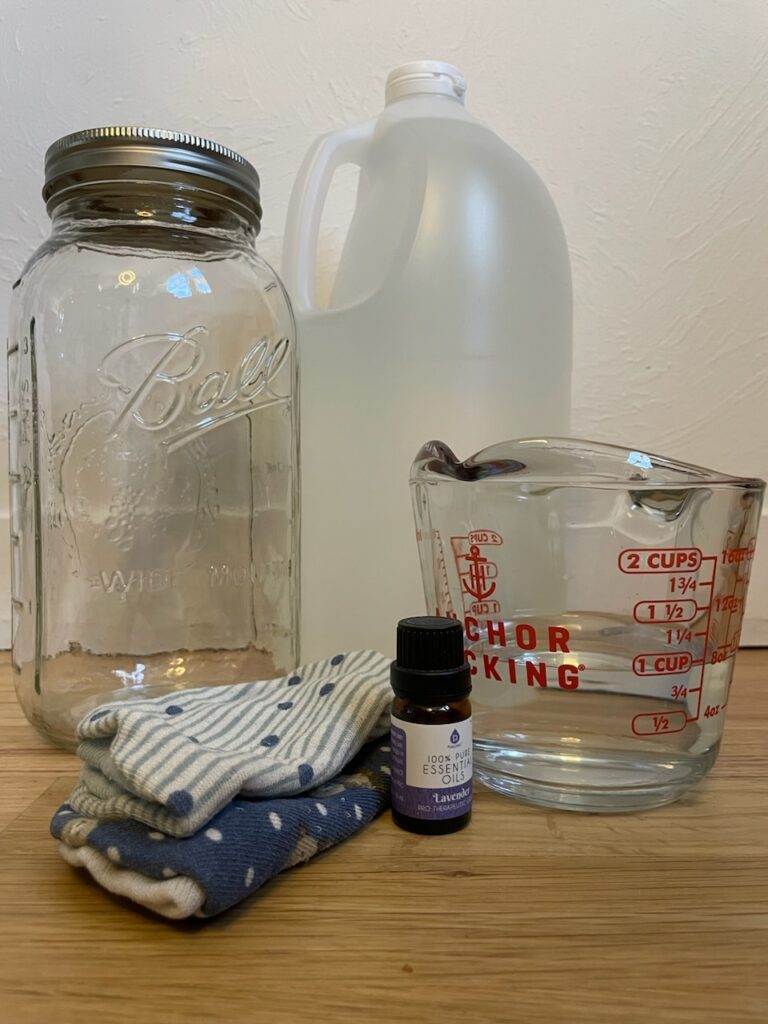
- A glass or plastic jar or container with a leak proof lid
- Vinegar
- Rags, old wash cloths (I used baby wash cloths from the Dollar Tree)
- Essential Oils (optional)
- Water (optional)
Selecting a container can be as simple as repurposing old pickle jars. Do you have a mason jar lying around? If you do not have one of these items lying around, or you don’t want to wait to finish all of your pickles that are in the fridge, jars and plastic container can be found at your local Dollar Tree for $1.25, or you can go to your local thrift store or Goodwill. I have seen mason jars and other containers ranging from .25-$1.00.
When choosing your cloth item whether it be rags, old wash cloths or baby wash cloths like what I chose, be sure that these will not fray on the edges. No one wants to have loose threads all over their clothing. What I ended up doing, to make sure this didn’t happen to me, I took two of the baby wash cloths (found at my local Dollar Tree) and sewed them together. Not only did it make them thicker, but it also made them stronger, so they will last longer. I have been using them for almost a year now and they are holding up amazingly! Now, do not get discouraged if you cannot sew. This step is totally not necessary to do this DIY.
How to make DIY Dryer Sheets:
Step 1:

Take your glass or plastic container and fill it up with 1 cup of vinegar. I do 2 cups for the size of my container. If you do not like the smell of vinegar, this is where the water option comes into play. Just add equal parts of water to the vinegar to dilute it. If you are worried about your clothes smelling like vinegar when they are finished drying, (I know I was), do not fret! Your clothes will not come out smelling like vinegar. Diluting the vinegar also helps the decrease of smell.
Step 2:

This step is optional and is not necessary. Add a few drops of essential oils to the vinegar. If you are not diluting the vinegar and sticking with the 1 cup, I would only do 1-2 drops of essential oils. I personally choose to skip this step all together.
A WORD OF CAUTION IF USING ESSENTIAL OILS. OILS UNDER HEAT MAY START A FIRE. IF YOU CHOOSE TO ADD ESSENTIAL OILS TO YOUR SOLUTION, PLEASE DO NOT LEAVE THE HOUSE WHILE YOUR DRYER IS RUNNING. BETTER SAFE THAN SORRY.
Step 3:

Add the cloth into the container and that is it! Now it is ready to go. Load up the dryer, remove the cloth from the container, squeeze out the vinegar solution, and simply just toss it into the dryer with all of your clothing. When your dryer finishes, remove items, and when you find the cloth, return it back into the container so it’s ready to be used again and again.
And that’s it! Simple, easy and quick DIY dryer sheets that take two minutes or less to pull together, and with little to no cost! No more hassle, and no more waste!